Workbook · 21-page PDF · Premium
Pantry Organization Tips: A 7-Zone System That Survives Real Life
Pantry organization tips that last: build 7 zones, decide what to decant, and keep it tidy in 10 minutes a week. Premium PDF adds worksheets and label templates.

The full workbook, ready to print
- ✓Session 1 worksheet: measure, empty and triage one shelf at a time
- ✓Decant-or-don't decision rules by household size and usage frequency
- ✓Container sizing chart matched to shelf depth, plus $0 / $50 / $200 budget tiers
- ✓Printable label templates, including picture labels for young children
- ✓The low-tech inventory and restock board, ready to print
- ✓Weekly 10-minute and monthly 30-minute maintenance checklists
- ✓Small-space adaptations for cabinet-only kitchens and no-pantry homes
Hosted on FileJoker. Premium members download instantly; free download has a wait.
In a hurry? Free one-page checklist22 items to tick off · print-ready PDF, no sign-upDownload freeIncluded bonuses — free with the guide
1 extra guide from the same topicA look inside the PDF
10 sections · 21 pages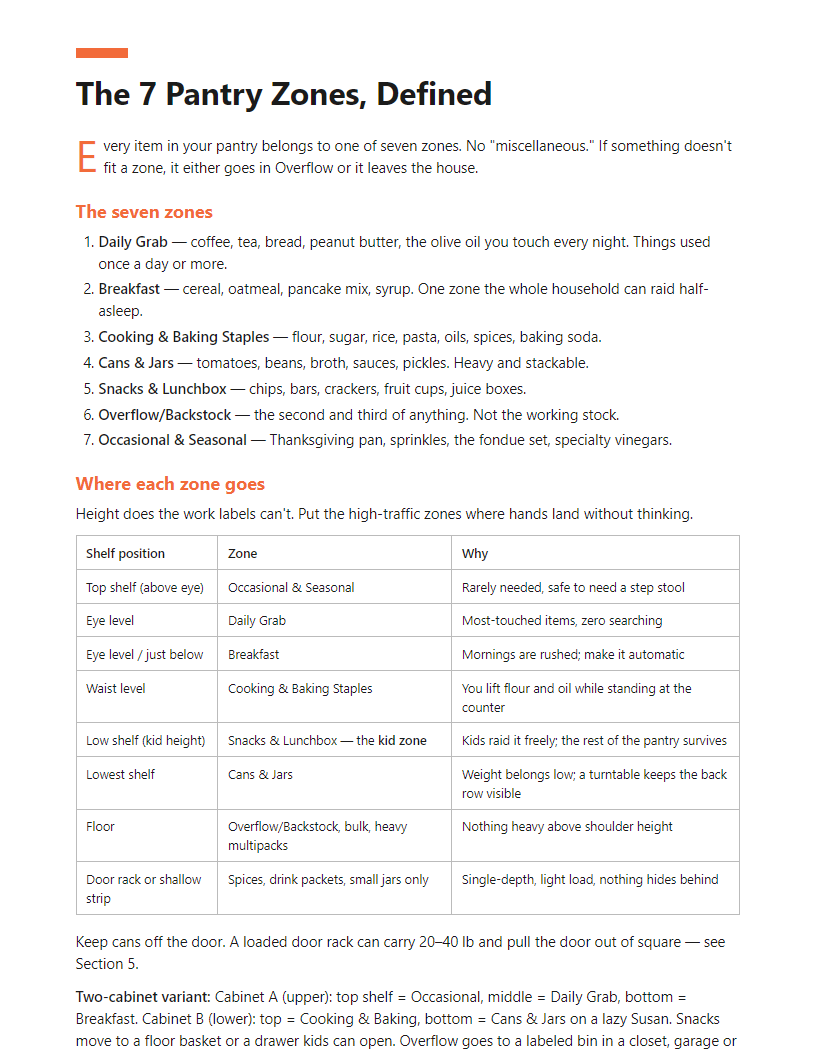


Full table of contents
- Why Pantries Un-Organize Themselves (and What to Build Instead)
- The 7 Pantry Zones, Defined
- Session 1: Measure, Empty, Triage
- The Decant-or-Don't Decision Rules
- Container Sizing by Shelf Depth — and Budget Tiers
- Labels That Stay Straight and Actually Get Read
- The Low-Tech Inventory & Restock Board
- Getting the Household to Use the System
- Seven Mistakes That Undo a Pantry Makeover
- The Maintenance Routine: 10 Minutes Weekly, 30 Minutes Monthly
In this article
You organized the pantry in March, and by June it’s chaos again — two open bags of rice, a sauce that expired in 2022, and containers that hold almost the whole box. These pantry organization tips skip the pretty-photo inspiration and give you a system instead: seven working zones based on how your household actually reaches for food, rules for what the kids and your partner can realistically put back, and a short weekly reset that stops the slow slide into mess.
On this page you’ll get the zone definitions, the household buy-in tactics, and the mistakes that quietly undo a makeover. The premium PDF adds the measuring worksheet, decant decision rules, container sizing by shelf depth, printable labels, and an inventory board.
The short answer
To organize a pantry so it stays organized:
- Empty and triage one shelf at a time; bin anything expired or forgotten.
- Measure shelf depth, height, and width before buying a single container.
- Set 7 zones: daily grab, baking, grains/pasta, canned goods, snacks, breakfast/drinks, and overstock.
- Decant selectively — only items you use weekly and that fit one container fully.
- Label the shelf, not just the container, so everyone returns things correctly.
- Keep an inventory list on the door to stop over-buying.
- Reset 10 minutes weekly, deep-check 30 minutes monthly.
Why Pantries Un-Organize Themselves (and What to Build Instead)
Your pantry didn’t fail because you’re messy. It failed because the system had no rules, and rules are the only thing that survives a busy Tuesday.
The three ways pantry order collapses
1. No fixed homes. When a box of crackers can live in four places, it lives in all of them. Nobody can be wrong, so nobody puts anything back. You buy a third jar of cumin because the first two are hiding behind the cereal.
2. Containers sized to the shelf, not the pack. You buy a pretty canister, pour in the 2 lb bag of rice, and 6 oz won’t fit. Now you have an orphan bag with nowhere to go. Multiply that by fifteen categories and the counter becomes the overflow shelf.
3. A system only one person understands. If the logic lives in your head, it dies the moment your spouse unloads groceries. “Everything belongs on the same shelf” is a reasonable default when no one told you otherwise.
Stop comparing
The pantries you’ve seen online are styled for a camera. One cook, one shopping trip, no Costco packs, no half-eaten snack boxes. Yours has to hold four people’s food and a 5 lb bag of flour. A deep shelf where things vanish into the abyss, or a 1970s kitchen with cabinets and no pantry at all, is a real constraint — not a personal failing. You will not be decanting everything. Nobody sane does.
What this workbook does instead
Measure → zone → size containers to the pack → label → weekly reset. Five steps, in that order. Measurements come first because every container decision depends on your actual shelf depth, not a product photo.
You get 5 worksheets, 1 label sheet, and three short sessions — roughly 90 minutes, 45 minutes, and 30 minutes. Not a lost weekend. You can stop between sessions and the pantry still works.
Success looks like this: you can see every item, nothing expires unseen, and ten minutes on Sunday puts it all back.
The 7 Pantry Zones, Defined
Every item in your pantry belongs to one of seven zones. No “miscellaneous.” If something doesn’t fit a zone, it either goes in Overflow or it leaves the house.
The seven zones
- Daily Grab — coffee, tea, bread, peanut butter, the olive oil you touch every night. Things used once a day or more.
- Breakfast — cereal, oatmeal, pancake mix, syrup. One zone the whole household can raid half-asleep.
- Cooking & Baking Staples — flour, sugar, rice, pasta, oils, spices, baking soda.
- Cans & Jars — tomatoes, beans, broth, sauces, pickles. Heavy and stackable.
- Snacks & Lunchbox — chips, bars, crackers, fruit cups, juice boxes.
- Overflow/Backstock — the second and third of anything. Not the working stock.
- Occasional & Seasonal — Thanksgiving pan, sprinkles, the fondue set, specialty vinegars.
Where each zone goes
Height does the work labels can’t. Put the high-traffic zones where hands land without thinking.
| Shelf position | Zone | Why |
|---|---|---|
| Top shelf (above eye) | Occasional & Seasonal | Rarely needed, safe to need a step stool |
| Eye level | Daily Grab | Most-touched items, zero searching |
| Eye level / just below | Breakfast | Mornings are rushed; make it automatic |
| Waist level | Cooking & Baking Staples | You lift flour and oil while standing at the counter |
| Low shelf (kid height) | Snacks & Lunchbox — the kid zone | Kids raid it freely; the rest of the pantry survives |
| Lowest shelf | Cans & Jars | Weight belongs low; a turntable keeps the back row visible |
| Floor | Overflow/Backstock, bulk, heavy multipacks | Nothing heavy above shoulder height |
| Door rack or shallow strip | Spices, drink packets, small jars only | Single-depth, light load, nothing hides behind |
Keep cans off the door. A loaded door rack can carry 20–40 lb and pull the door out of square — see Section 5.
Two-cabinet variant: Cabinet A (upper): top shelf = Occasional, middle = Daily Grab, bottom = Breakfast. Cabinet B (lower): top = Cooking & Baking, bottom = Cans & Jars on a lazy Susan. Snacks move to a floor basket or a drawer kids can open. Overflow goes to a labeled bin in a closet, garage or under a bed.
Tip: The kid zone is not a reward. It’s a firewall. If kids have one shelf they’re allowed to wreck, they stop wrecking the other six.
Size zones by use, not by looks
Count touches for one week. Tally a mark each time someone pulls something from a category, then split the shelf width in proportion.
Example: A 36 in shelf. One week of tallies: Snacks 84 touches, Staples 56, Baking 28. Split it 18 in / 12 in / 6 in. Snacks win the width even though the baking jars photograph better.
Resist giving a pretty category prime real estate it hasn’t earned.
Awkward spaces
- Deep shelves: run each zone front-to-back in one bin, so you pull the bin instead of reaching into the abyss.
- Shallow hall closet: combine Cans & Jars with Cooking & Baking on a low shelf; use the door for spices and small jars.
- One tall cupboard: keep all seven zones but give Overflow and Occasional to a different room entirely.
Getting the Household to Use the System
A system only you understand is a system that lasts a week. If four people cook in your kitchen, four people need the walkthrough.
The 15-minute handover
Do this the day you finish Session 1, while the shelves still look right.
- Walk the zones out loud. Point at each of the seven zones. Say the name. Say what lives there.
- Give one rule per zone. Not five. One. “Daily Grab is open bins — no lids.” “Overflow is backstock only; nothing opened goes here.”
- Show the restock board. Hand them the pen. Have them write one item on it right then.
- Take a photo of the finished shelves. Text it to everyone. That photo is the reset reference — when things drift, you rebuild to the picture, not to memory.
- Tape the rules card inside the pantry door. Print it. Don’t email it.
The one-page Household Rules card
| Zones | Daily Grab · Breakfast · Cooking & Baking Staples · Cans & Jars · Snacks & Lunchbox · Overflow/Backstock · Occasional & Seasonal |
| Rule 1 | Put it back in a labeled zone. Right zone beats right spot. |
| Rule 2 | Last of it? Write it on the board. No board entry = no restock. |
| Rule 3 | Open one package per item. Second bag stays in Overflow. |
| Rule 4 | Empty container goes in the sink, not back on the shelf. |
| Rule 5 | Don’t know where it goes? Leave it on the counter. Don’t invent a spot. |
| Weekly reset | [Day] · 10 minutes · everyone pitches in |
When your partner thinks everything goes on one shelf
This is extremely common, and it’s not defiance. It means you have too many categories for them to hold in their head. Fix it on your end:
- Cut your categories. Seven zones, not twenty bins.
- Buy wider bins so the target is bigger and harder to miss.
- Accept good-enough. Pasta in the Cooking & Baking Staples bin is a win, even if it’s not in the pasta row.
Kid-proofing
- Put one free-raid snack bin at child height. Anything in it is approved, no asking. That stops the climbing and the rummaging.
- Keep the step stool outside the pantry, so it isn’t used to reach the baking shelf.
- Use picture labels at their eye level — a photo or drawing, not just words.
ADHD-friendly adjustments
Fewer bins, bigger bins. Open tops. No lids on daily items. Visible beats hidden every time — if it’s behind a door inside a closed box, it doesn’t exist.
Dementia and caregiving adaptations
- Never move things once placed. Consistency matters more than efficiency.
- High-contrast labels: black text, white background, large print.
- Limit choices per shelf — three to five items, not fifteen.
- Consider a dedicated zone or small second pantry with their snacks, tea, cups and plates together.
Seven Mistakes That Undo a Pantry Makeover
Most pantries collapse for the same seven reasons. Each one has a fix that takes less than an hour.
1. Buying containers before measuring
This is the expensive one. You order a matching 10-piece set, and three jars are too tall for the shelf, two are too deep for the door, and the 5 lb flour bag leaves a cup of flour with nowhere to go. Pretty containers that don’t fit your actual shelves are the most common wasted money in a pantry project.
Fix: measure first, buy in two rounds. Round one is the containers you’re certain about — the five staples you open weekly. Round two is everything else, bought after four weeks of living with the system, when you know what’s actually annoying you.
2. Decanting everything
The Thanksgiving-only cornmeal does not need a jar. Every decanted item is a refill chore forever, and a chore nobody else in the house will do. Decant the things you open weekly and the things that spill, fall over, or won’t stay closed. Leave the once-a-year items in their boxes. The 4-question test in Section 4 settles any argument.
3. Stacking rows on deep shelves
Three rows of cans on a 24-inch shelf means row three is invisible, and invisible food expires. Pull-out bins, lazy Susans and risers exist to bring the back row forward in one motion — see the depth lookup in Section 5 for what fits your measurement.
4. Labels only you can read
Script font, no front label, labels stuck on the lid where no one standing up can see them. If your husband or your kid can’t read it from three feet away, they’ll put the box wherever there’s a gap. Labels belong on the container and on the shelf edge, so the empty spot still tells you what goes there.
5. No overflow plan
Backstock has to live somewhere. If you don’t assign it a shelf, a bin, or a closet, it migrates to the floor, the countertop, and the top of the microwave. Then you buy a fourth bag of rice because you can’t see the three you own. Zone 6 exists for exactly this.
6. One exhausting session, no reset
A weekend makeover with no follow-up is a before-and-after photo, not a system. Entropy starts the next time someone is in a hurry. Big sessions are fine — just schedule the 10-minute weekly reset before you start the makeover, and put it on the shared calendar where the whole household can see it.
7. Storing the wrong things in there
- Potatoes and onions together — onions speed up potato sprouting. Separate bins, separate shelves.
- Oils and spices near the oven or a sunny window — heat turns oil rancid and dulls spices. Move them to the coolest shelf.
- Open flour, oats, rice, or cornmeal after a pest sighting — paper and bags don’t stop moths or weevils. Those four go into hard-sided sealed containers, no exceptions.
Warning: If you’ve seen one moth, check every open bag of grain, flour, and pet food the same day. Discard anything with webbing, then wipe the shelves.
Pantry Questions, Answered
What are the 7 pantry zones, in one line each?
- Daily Grab — coffee, tea, bread, peanut butter, the oil you touch every night.
- Breakfast — cereal, oatmeal, pancake mix, syrup; raidable half-asleep.
- Cooking & Baking Staples — flour, sugar, rice, pasta, oils, spices, leaveners.
- Cans & Jars — tomatoes, beans, broth, sauces, pickles.
- Snacks & Lunchbox — kid-height, self-serve.
- Overflow/Backstock — the second and third of anything, nothing opened.
- Occasional & Seasonal — sprinkles, specialty vinegars, the holiday pan.
What should not live in a pantry?
- Potatoes and onions together. Onions make potatoes sprout. Separate baskets, separate shelves, or onions in the kitchen and potatoes somewhere dark and cool.
- Oil next to the stove or above the oven. Heat turns oil rancid fast. Move it to a cool interior shelf.
- Nuts, nut flours, whole-grain flours, wheat germ. The oils in them go rancid at room temperature. Freezer or fridge.
- Opened dry goods after a pest sighting. If you’ve had moths or weevils, anything in a paper bag, cardboard box, or clipped liner is suspect. Toss it, vacuum the shelf seams, and restock only in sealed containers.
Warning: Moths chew through paper and thin plastic film. Glass, thick PET, or gasket-lid containers are the only reliable barrier. Sealing powders, oats, and flours is the single best pest insurance you can buy.
What should I have in my pantry at all times?
A 15-item baseline. Par level means “reorder when you drop below this.”
| Item | Par level |
|---|---|
| Long pasta | 2 boxes |
| Rice | 2 lb |
| Canned tomatoes | 3 cans |
| Canned beans | 4 cans |
| Broth or bouillon | 32 oz |
| Cooking oil | 1 full + 1 spare |
| Vinegar | 1 bottle |
| All-purpose flour | 2 lb |
| Sugar | 2 lb |
| Salt | 1 full box |
| Peanut butter | 1 jar |
| Oats | 1 lb |
| Canned tuna or chicken | 3 cans |
| Onions and garlic | 3 onions, 1 head |
| Coffee or tea | 1 full + 1 spare |
Write your own par numbers on the restock board. They’re household-specific.
I have no pantry — just cabinets. Now what?
Spread the zones across three cupboards instead of three shelves.
- Cupboard 1 (nearest the kettle): Daily Grab + Breakfast.
- Cupboard 2 (nearest the stove): Cooking & Baking Staples + Cans & Jars.
- Cupboard 3 (highest or farthest): Occasional & Seasonal + Overflow/Backstock.
Snacks & Lunchbox goes in a floor basket or a low drawer kids can open on their own. Keep one labeled donate-and-eat-this bin anywhere visible. Use lazy Susans in corners, and pull-out bins in anything deeper than 14 inches — deep cabinets are where food disappears for years.
Should I throw out everything past the date?
No. “Best before” is quality, not safety. Sort into three piles:
- Unopened and in date you won’t eat — donate. Many food banks and shelter kitchens take sealed, in-date goods.
- Just past date, sealed, smells fine — put it in a dated eat-this box and meal plan from it. Anything still there in two months goes out.
- Opened, stale, rancid, or pest-touched — trash.
What does a pantry overhaul cost and how long does it take?
Plan on about 90 minutes for Session 1, and roughly 2.5–3 hours total across all three sessions. Containers run $0–$300 depending on tier. You can start with zero spending by using boxes you already own.
- ✓Session 1 worksheet: measure, empty and triage one shelf at a time
- ✓Decant-or-don't decision rules by household size and usage frequency
- ✓Container sizing chart matched to shelf depth, plus $0 / $50 / $200 budget tiers
- ✓Printable label templates, including picture labels for young children
- ✓The low-tech inventory and restock board, ready to print
- ✓Weekly 10-minute and monthly 30-minute maintenance checklists
- ✓Small-space adaptations for cabinet-only kitchens and no-pantry homes
Frequently asked questions
What are the 7 pantry zones?
The seven zones are: daily grab (coffee, bread, lunchbox items), baking supplies, grains and pasta, canned and jarred goods, snacks, breakfast and drinks, and overstock/backstock. Assign each zone a fixed shelf or section based on reach height — daily items at eye level, overstock up high or down low. Zones work because people return items to a *place*, not to a vague area.
What should never be stored in a pantry?
Keep out anything heat- or light-sensitive: nut and seed oils, whole-grain flours, nuts, and ground spices in clear jars near a stove all go rancid or stale fast. Potatoes and onions shouldn't share a bin (they spoil each other). Avoid storing cleaning products beside food, and don't keep opened bulk bags unsealed — they're the main source of pantry pests.
What should I always have in my pantry?
A workable baseline: a long-cooking grain (rice, oats), a quick one (pasta, couscous), canned tomatoes, canned beans, stock or bouillon, cooking oil, vinegar, salt, pepper, a few core spices, canned fish or protein, and a shelf-stable milk or nut butter. That set covers most weeknight meals. Build the list around meals you actually cook, then track it on a restock board so gaps show up before dinnertime.
How do I stop the pantry getting messy again?
Messiness returns when the system needs more effort than the mess. Fix it with three things: open bins instead of lidded ones for high-traffic zones, labels on shelf edges so the right spot is obvious, and a scheduled 10-minute weekly reset where you front-face items and note what's running low. Monthly, spend 30 minutes checking dates in the overstock zone.
How do I get my family to follow the pantry system?
Make the correct action the easiest one. Put kids' snacks in a low, open, un-lidded bin they can reach and return without help. Use picture labels for pre-readers, and shelf-edge labels so nobody has to guess. Limit zones to seven — more categories mean more decisions and more guessing. Then do the weekly reset yourself rather than nagging; the system should absorb small errors.
Should I decant everything into containers?
No. Decant only items you use weekly, that are prone to spills or pests, and where one full package fits one container. Keep things in original packaging when cooking instructions matter, when the item is used rarely, or when the bag size doesn't match any container you own — leftover product with nowhere to go is what breaks most systems. The PDF gives exact decision rules by household size.
We collected 133 real questions and comments about "pantry organization tips" (123 from YouTube comments, 4 from People Also Ask, 6 from search suggestions), grouped them into 15 recurring problems, and built this guide to resolve the 7 that block people most. The top-ranking pages were reviewed for gaps; 7 of those gaps became dedicated sections.
Edited by Alex Hirn · Last updated November 2, 2026 · How we make our guides
More in Home & Organizing
 free
 premium+1 bonus
 premium+1 bonus
 premium+1 bonus